I have Wolf flat-plate collector on my roof to heat water in the bottom of the warm water tank. There is simple monitoring (Wolf BM Solar) which shows whether heating is on and temperatures on the collector and in the tank. I wanted to see this data in my Home Assistant.
Wolf does not support OpenTherm but eBUS. After short searching on internet, I've found eBUS adapter which can monitor/control eBUS devices (mainly boilers). Delivery took about 2 months but finally I have it now.
First steps with the adapter are well described. Yet I had some issues:
- flashing and accessing web interface (easi) was fine
- I've struggled with easi authentication - after entering credentials, accessing it from the same browser still worked. Only accessing it from another browser timed out and I don't see a way how to enter credentials (passing them in the url does not work). I will dig deeper into it later. UPDATE: it's fixed by 2023-09-03 firmware.
- I run ebusd on my Turris router in docker. For some reason, which I don't remember now, all my docker containers had forbidden access to internet. HomeAssistant is fine with it but ebusd needs to download configuration files and it took me a while to find out why requests for configuration were failing.
The biggest issue was with configuration. My Wolf is not supported out of the box. Following docker readme, I have run the following command:
root@turris:~# docker run --rm -it -p 8888 john30/ebusd --scanconfig -d ens:192.168.1.87:9999 --latency=20
2023-09-03 18:07:50.453 [main notice] ebusd 23.2.23.2 started with auto scan on device: 192.168.1.87:9999, enhanced
2023-09-03 18:07:51.734 [bus notice] device status: resetting
2023-09-03 18:07:51.735 [bus notice] bus started with own address 31/36
2023-09-03 18:07:51.740 [bus notice] signal acquired
2023-09-03 18:07:52.240 [bus notice] device status: reset, supports info
2023-09-03 18:07:52.355 [bus notice] device status: extra info: firmware 1.1[380f].1[380f], jumpers 0x0f
2023-09-03 18:07:58.939 [bus notice] new master 71, master count 2
2023-09-03 18:07:58.939 [update notice] received unknown BC cmd: 71fe50180e0080008000800080008000800000
2023-09-03 18:08:02.009 [bus notice] scan 76: ;Kromschroeder;  ;0227;-
2023-09-03 18:08:02.009 [update notice] store 76 ident: done
2023-09-03 18:08:02.009 [update notice] sent scan-read scan.76  QQ=31: Kromschroeder;  ;0227;-
2023-09-03 18:08:02.009 [bus notice] scan 76: ;Kromschroeder;  ;0227;-
2023-09-03 18:08:02.219 [main error] HTTP failure: receive error: 404 Not Found
2023-09-03 18:08:02.219 [main error] unable to load scan config 76: list files in kromschroeder ERR: element not found
2023-09-03 18:08:02.219 [main error] scan config 76: ERR: element not found
2023-09-03 18:08:13.921 [update notice] received unknown BC cmd: 71fe50171000011a016b0200800080008000800080
2023-09-03 18:08:28.879 [update notice] received unknown BC cmd: 71fe50180e0080008000800080008000800000
I connected to docker shell and get more info:
root@600974f7960e:/# ebusctl i
version: ebusd 23.2.23.2
device: 192.168.1.87:9999, enhanced, firmware 1.1[380f].1[380f]
signal: acquired
symbol rate: 20
max symbol rate: 47
min arbitration micros: 4
max arbitration micros: 4
min symbol latency: 17
max symbol latency: 19
scan: finished
reconnects: 0
masters: 2
messages: 12
conditional: 0
poll: 0
update: 4
address 31: master #8, ebusd
address 36: slave #8, ebusd
address 71: master #9
address 76: slave #9, scanned "MF=Kromschroeder;ID=  ;SW=0227;HW=-"
Using HowTos and Message definition, I was able to decode above unknown messages:
2023-09-03 18:08:13.921 [update notice] received unknown BC cmd: 71fe50171000011a016b0200800080008000800080
2023-09-03 18:08:28.879 [update notice] received unknown BC cmd: 71fe50180e0080008000800080008000800000

root@7e8bde847891:/# ebusctl grab result
71fe50171000010301580200800080008000800080 = 2
71fe50180e0080008000800080008000800000 = 3
There is a master device (id 71) - that's the solar heating. Then there is a slave device (id 76) which is Wolf BM Solar module (it displays data from master). The master broadcasts (BC in log or fe in message) messages. PBSB of messages are 5017 and 5018.
I've searched through ebusd-configuration repo for PBSB codes and found them in ebusd-2.x.x/de/wolf/50.csv.
To be able to use updated configs, I've created ebusd_config folder on turris that is shared to ebusd docker container. Based on unable to load scan config 76: list files in kromschroeder error, I've created kromschroeder subfolder there where I
- copied
ebusd-2.x.x/de/_templates.csvtoebusd_config/kromschroeder/_templates.csv - copied
ebusd-2.x.x/de/wolf/50.csvtoebusd_config/kromschroeder/76.csv - copied
ebusd-2.x.x/de/wolf/broadcast.csvtoebusd_config/kromschroeder/broadcast.csvand added 2 lines with missingPBSBcodes (changing message type to broadcastb):
# type (r;w;u;1-9),class,name,comment,QQ,ZZ,PBSB,ID,field1,part (m;s),type / templates,divider / values,unit,comment,field2,part (m;s),type / templates,divider / values,unit,comment,field3,part (m;s),type / templates,divider / values,unit,comment,field4,part (m;s),type / templates,divider / values,unit,comment,field5,part (m;s),type / templates,divider / values,unit,comment,field6,part (m;s),type / templates,divider / values,unit,comment,field7,part (m;s),type / templates,divider / values,unit,comment
*b,broadcast,,,,FE,,,,,,,,,,,,,,,,,,,,,,,,,,,,,,,,,,,,,,,,,,,,
b,,betrd,Betriebsdaten des Feuerungsautomaten an den Regler,,,0503,01,status,,UCH,,,Feuerungsautomatstatus,zustand,,HEX,,,Feuerungsautomatzustand,stellgrad,,percent0,,,StellgradKesselleistung (Wolf Gastherme Ersatzwert: FF),kesseltemp,,temp1,,,Kesseltemperatur ,ruecklauftemp,,temp0,,,Rücklauftemperatur ,boilertemp,,temp0,,,Boilertemperatur ,aussentemp,,outsidetemp,,,
b,,sollw,Sollwertübertragung des Reglers an andere Regler,,,0800,,kesselsolltemp,,temp2,,,Kesselsollwert,aussentemp,,temp2,,,Außentemperatur,leistungszwang,,D1B,,%,Leistungszwang,status,,HEX,,,Status,brauchwassersolltemp,,temp2,,,Brauchwassersollwert,,,,,,,,,,,,
b,,ertraege,,,,5018,,leistung,,D2B,,,Solarleistung,ertraglow,,UCH,,,ErtragTagLow,ertraghigh,,UCH,,,ErtragTagHigh,ertragsummelow,,UCH,,,SummeErtragLow,summertraghigh,,UCH,,,SummeErtragHigh,ertragsumme,,UCH,,,SummeErtragM,,,,,,
b,,temp,,,,5017,,pumpe,,UCH,0xbc=off;0xbd=on,,SolarPumpe,,,IGN:1,,,,kollektortemp,,temp,,,Kollektortemperatur,wwsolartemp,,temp,,,WW Solartemperatur,,,,,,,,,,,,,,,,,,
I ran the docker again and success:
root@turris:~# docker run --rm -it -p 8888 -v "/srv/ebusd_config:/mnt:ro" john30/ebusd --scanconfig --configpath=/mnt -d ens:192.168.1.87:9999 --latency=20
2023-09-03 21:03:05.609 [main notice] ebusd 23.2.23.2 started with auto scan on device: 192.168.1.87:9999, enhanced
2023-09-03 21:03:05.853 [bus notice] device status: resetting
2023-09-03 21:03:05.854 [bus notice] bus started with own address 31/36
2023-09-03 21:03:05.873 [bus notice] signal acquired
2023-09-03 21:03:06.305 [bus notice] device status: reset, supports info
2023-09-03 21:03:06.473 [bus notice] device status: extra info: firmware 1.1[380f].1[380f], jumpers 0x0f
2023-09-03 21:03:15.326 [bus notice] new master 71, master count 2
2023-09-03 21:03:15.326 [update notice] received unknown BC cmd: 71fe5017100001e000430200800080008000800080
2023-09-03 21:03:16.113 [bus notice] scan 76: ;Kromschroeder;  ;0227;-
2023-09-03 21:03:16.113 [update notice] store 76 ident: done
2023-09-03 21:03:16.113 [update notice] sent scan-read scan.76  QQ=31: Kromschroeder;  ;0227;-
2023-09-03 21:03:16.113 [bus notice] scan 76: ;Kromschroeder;  ;0227;-
2023-09-03 21:03:16.115 [main notice] read common config file kromschroeder/broadcast.csv
2023-09-03 21:03:16.116 [main notice] read scan config file kromschroeder/76.csv for ID "", SW0227, HW65535
2023-09-03 21:03:16.116 [main notice] found messages: 8 (0 conditional on 0 conditions, 0 poll, 4 update)
2023-09-03 21:03:30.288 [update notice] received update-read broadcast ertraege QQ=71: -;0;128;0;128;0
2023-09-03 21:03:45.274 [update notice] received update-read broadcast temp QQ=71: 0;14.00;36.19
Data from master broadcast (temp QQ=71: 0;14.00;36.19) tells me that:
0- pump is not running14.00- collector temperature36.19- warm water tank temperature
I'm not interested in ertraege (yield of the solar) - gathering is turned off anyway.
The final command to run ebusd in the background has to use environment variables to set the parameters:
docker run --name ebusd -d -p 9090:9090 -v "/srv/ebusd_config:/mnt:ro" -e EBUSD_DEVICE=ens:192.168.1.87:9999 -e EBUSD_SCANCONFIG= -e EBUSD_CONFIGPATH=/mnt -e EBUSD_LATENCY=20 -e EBUSD_HTTPPORT=9090 john30/ebusd
There are several options how to get data from ebusd to Home Assistant. As I don't use MQTT and I need just 2 values, I've decided to use simple polling via http (that's why EBUSD_HTTPPORT parameter in above command). I've tried to secure it by -e EBUSD_READONLY= but that resulted in failures of reading the configuration (which is actually expected as I have found later).
rest:
  - resource: http://192.168.1.1:9090/data/broadcast/temp
    scan_interval: 15
    binary_sensor:
      - name: Solar - running
        unique_id: solar_ohrev_id
        device_class: running
        value_template: "{{ value_json['broadcast']['messages']['temp']['fields']['pumpe']['value']|int == 1 }}"
    sensor:
      - name: Solar - collector temperature
        unique_id: solar_kolektor_id
        state_class: measurement
        device_class: temperature
        value_template: "{{ value_json['broadcast']['messages']['temp']['fields']['kollektortemp']['value'] }}"
        unit_of_measurement: °C
      - name: Solar - tank temperature
        unique_id: solar_teplota_vody_id
        state_class: measurement
        device_class: temperature
        value_template: "{{ value_json['broadcast']['messages']['temp']['fields']['wwsolartemp']['value'] }}"
        unit_of_measurement: °C
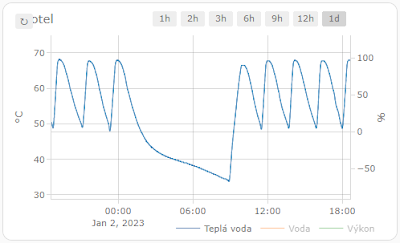
This is graph from today's sunny weather. It's nicely visible how the full tank was heated to over 60°C.
red line- collector's temperatureblue line- bottom tank temperatureorange line- top tank temperature